Updated 27 September 2018
Welcome to the Chimpeon Legacy Help. Read it and you'll be well on your way to automating almost any in-game action that involves pressing a key or mouse button.
NOTE: This Help refers to Chimpeon Legacy which is unsupported and has been superseded by Chimpeon 2.n. It is advised you download, install and use this version instead.
WARNING: As of 18 April 2023, Chimpeon Legacy cannot be activated and will display connection errors when launched and during its operation. This is because the technology used by Chimpeon Legacy to connect to the Chimpeon server is no longer supported. There are no plans to update Chimpeon Legacy to include supported connection technology and there are no plans to enable the unsupported connection technology on the Chimpeon server. It is advised you download, install and use Chimpeon 2.n instead.
Developed for the automation of games, Chimpeon is a Windows application that completes repetitive tasks, performs combat rotations, prevents AFK, accepts on-screen notifications, and much more!
Almost anything you do in-game with the keyboard or a mouse click, Chimpeon can automatically do for you!
From downloading and installing, to launching and licensing, Chimpeon is intuitive and simple to use.
Chimpeon has the following system requirements:
NOTE: If Chimpeon does not appear to work with a game, change the Method setting, and/or enable the Attach to Send To setting, and/or select the correct game window using the Find Send To button. If all of this fails Chimpeon may need to be run as an Administrator or its Compatibility Mode may need to be set. For further details, read the Chimpeon 101: Getting Chimpeon Working With a Game.
Chimpeon can be downloaded from the following location:
To begin the installation process, double-click the Chimpeon setup program (Chimpeon_Setup.exe) then follow the on-screen instructions.
During the installation process you will be prompted to specify an installtion path and folder. The folder name you specify will be the name adopted by the Chimpeon exe, process, Start menu folder and shortcut, desktop shortcut, title bar and taskbar.
To launch (run) Chimpeon, click the Chimpeon option in the Chimpeon folder on the Windows Start menu, or double-click the Chimpeon shortcut icon (see Fig. below) on the Windows Desktop.

Fig. Chimpeon shortcut icon
NOTE: During launch an Update window will appear if a newer version of Chimpeon is available.
If you use Windows Vista, 7, 8 or 10, Chimpeon may not operate with certain games. This can sometimes be resolved by setting the compatibility mode for chimpeon.exe to Windows XP, Vista or 8. To do this, perform the following actions:
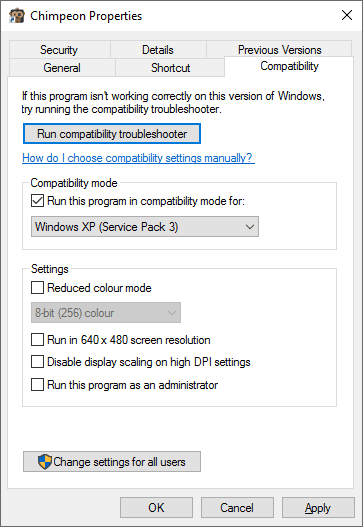
Fig. Chimpeon Properties window (Compatibility tab) (Windows 10)
The Chimpeon interface (see Fig. below) is where automation is configured, started and stopped.

Fig. Chimpeon interface
To ensure Chimpeon does not obscure the game window when automating, Compact View can be used. This reduces the size of the Chimpeon interface so it displays just the Title bar, Start/Stop button and the Notification bar (see Fig. below).

Fig. Compact View
To use Compact View, click the Compact View button (a down arrow) on the Title bar.
When in Compact View, click the Main View button (an up arrow) on the Title bar to return to the main Chimpeon interface.
To force the Chimpeon interface to stay on top of all other application windows in Windows, select the Stay On Top option on the Options menu.
Other Chimpeon windows (e.g. the Trigger Pixel(s) window) can also be forced to stay on top. Click the Stay On Top checkbox in the window to add a tick to it and force the window to stay on top.
The Groups panel and Actions panel in the Chimpeon interface (see Fig. above) can have the following actions performed on them to make more or less of their content visible:
The Groups panel and the Actions panel contain Show/Hide buttons (arrows) so one or the other can be visible while the other is not, or both can be visible.
Click a Show/Hide button to show or hide the respective panel.
If the Groups panel is visible, its Show/Hide panel will be an up arrow. For the Actions panel it will be a down arrow. The arrows are reversed if the panels are hidden.
Hiding the Groups panel causes the Actions panel (even if it was previously hidden) to appear in its place. Hiding the Actions panel causes the Groups panel (even if it was previously hidden) to appear in its place.
Showing the Groups panel or showing the Actions panel causes the other panel to reduce in size so both panels are visible. The size of both panels prior to one being hidden is the size both reappear at.
To enlarge the Groups panel and reduce the Actions panel, or to reduce the Groups panel and enlarge the Actions panel, perform the following actions:
Until a licence is purchased and activated, Chimpeon and associated in-game actions will stop functioning after a short period of time. The countdown starts as soon as you press the Start button or Start Hot Key and stops without warning.
After stopping, a window appears notifying you of the reason why this occurred. When the countdown on the window's Close button ends you can close the window and start Chimpeon again but it will continue stopping after a short period.
A licence can be purchased using the following link:
Following purchase, details of your order and an invoice can be viewed in the Order History panel of your account.
After successfully purchasing a licence, perform the following actions in Chimpeon to activate and remove the time restriction:
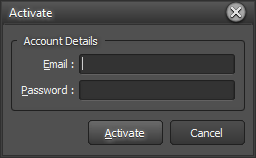
Fig. Activate window
If activation is successful, an Information window appears notifying you of this. Click the OK button and have fun!
The days remaining of your annual licence appear in the About window and your account.
NOTE: Activating a licence requires an Internet connection. If your PC connects to the Internet using a proxy it is likely proxy settings will need to be specified. For further details, refer to 5.3. Proxy Settings.
If more than one instance of Chimpeon is used on the same PC, the following actions must be performed to allow them to be activated simultaneously*:
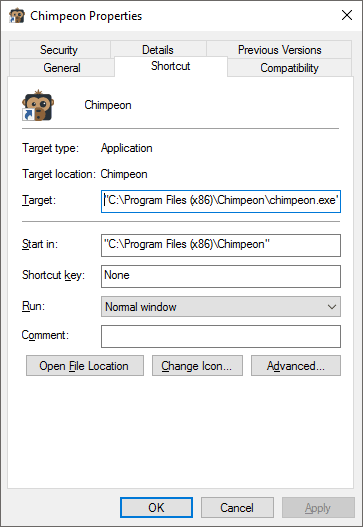
Fig. Chimpeon Properties window (Shortcut tab) (Windows 10)
*NOTE: The number of purchased licences must match or exceed the number of Chimpeons that will be activated simultaneously.
Chimpeon is occasionally updated to fix issues and introduce new features. By default, an Update window (see Fig. below) appears on launch if an update is available.
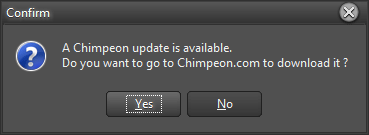
Fig. Update window
To start the update process, click the Yes button. You will be taken to the Chimpeon website where you can download the latest Chimpeon setup program (Chimpeon_Setup.exe).
For details about installing Chimpeon, refer to Installing.
If you prefer not to update Chimpeon, click the No button.
To disable or enable the Update window appearing on launch, refer to Check for Updates on Startup.
You can update Chimpeon at any time by selecting the Update option on the Help menu. If an update is unavailable the option is disabled.
The Chimpeon version, ID, EULA and copyright information is viewed in the About window (see Fig. below).
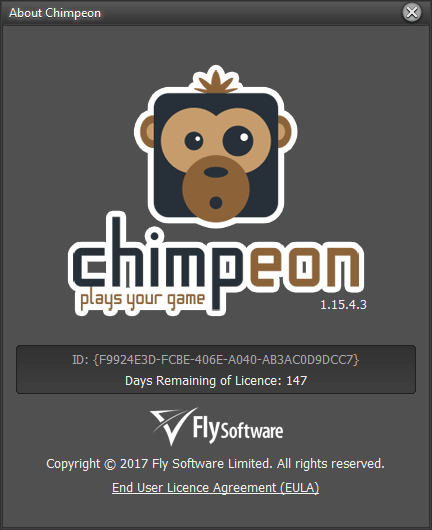
Fig. About window
To open the About window, select the About option on the Help menu.
To close the About window, click the Close button.
To exit Chimpeon, select the Exit option on the File menu or click the close button on the title bar.
NOTE: If a configuration file is open and unsaved, you will be prompted to save it prior to exiting.
NOTE: If the Chimpeon licence is not activated, a Chimpeon web page is opened in your default browser following exit.
To uninstall Chimpeon, use the Uninstall Program feature in the Windows Control Panel.
You need a Chimpeon account to purchase a licence and will be asked to sign-up for one during this process.
To sign-up for an account immediately, use the following link:
https://chimpeon.com/#openSignup1
To view your account, use the following link:
https://chimpeon.com/account/account
Your email and password can be changed and your address details can be specified (for inclusion on your invoice) in the User Details panel.
View your orders in the Order History panel.
View your licences in the Licence History panel.
Configuring Chimpeon to automate a game is normally very simple*:
Alternatively, a Group/Action Wizard is provided to the enable quick and easy creation of Groups and Actions.
MORE: For details about the Group/Action Wizard, refer to Group/Action Wizard.
NOTE: Chimpeon is unable to automate some games. The best way to find out if it can automate yours, is to try it! Also, if a game isn't automated, refer to the Chimpeon 101: Getting Chimpeon Working With a Game.
A Chimpeon configuration file stores Group and associated Action settings for a game you want Chimpeon to automate. These files can be created, opened and saved as required.
Configuration files have a .chimpeon extension.
By default, configuration files are stored in one of the following locations:
To create a configuration file, select the New option on the File menu. A new configuration file will be labelled untitled.chimpeon and will need to be saved to retain changes made to it.
If a configuration file is already open and unsaved, you will be prompted to save it prior to the new one being created.
To open a configuration file, perform the following actions:
If a configuration file is already open and unsaved, you will be prompted to save it prior to the new one being opened.
The five most recently opened configuration files appear on the File menu (most recent at the top).
Click the File menu then click the name of a recent file to open it.
Click the File menu then click Save to save the configuration file.
NOTE: Configuration files saved using a beta release are appended with '_beta_1.n.n.n'.
To save a configuration file with a new filename, perform the following actions:
NOTE: Configuration files saved using a beta release are appended with '_beta_1.n.n.n'.
Each configuration file is associated with a single game.
To select a game (or any application that is running), click the Send To list box then click the name of the game.
NOTE: The game must be running for it to appear in the list box.
NOTE: If the selected game is exited while Chimpeon is started, Chimpeon may or may not stop depending on whether the Stop If Send To Not Found setting is enabled or not in the Preferences window.
MORE: For further details about the Stop If Send To Not Found setting, refer to Stop If Send To Not Found.
The games listed in the Send To list box reflect the main window of each game, and selecting one normally allows Chimpeon to successfully automate it. However, some games have one or more windows within their main window and one of these may need to be selected before automation occurs. This is particularly evident if the Method 1 setting is specified for an Action (refer to 3.4.1.4. Method).
To select the main window or a window within the main window of a game, perform the following actions:
Following this, the name of the game appears in the Send To edit/list box. If it is the main window of the game it will only be the name of the game that appears. If it is a window within the main window of the game it will be the name of the game followed by a semicolon (;) and a number that appears.
EXAMPLE: Wizards & Ogres would be the main window. Wizards & Ogres;3 would be a window within the main Wizards & Ogres window.
NOTE: If Chimpeon does not automate a game, selecting a window within the main window of the game is one of the first things you should try in order to resolve this - especially if using the Method 1 setting for an Action. Remember, a game can contain multiple windows, so find, select and try each one.
If multiple instances of the same game (or application) are running, click the Instance speed buttons to select the instance you want to use with Chimpeon.
The first game launched becomes Instance 1. When another game is launched that becomes Instance 1 and the first game Instance 2. If the second game is exited, the first game becomes Instance 1.
A Group is a container for one or more Actions. Each Group determines when Chimpeon "presses" the keys and mouse buttons associated with its Action(s).
One or more Groups can be added and each appears in a list in the Groups panel. The order of Groups in the list determines the order they are checked to see if their Action On condition is satisfied.
EXAMPLE: If Group A appears at the top and Group B appears below it, Group A is checked first when Chimpeon is started. Chimpeon checks each Group in order (top to bottom) then starts again at the top (unless the Randomize Groups Order setting is enabled - see 3.3.7.1 Randomize Groups Order).
Each Group has the following settings:
Name is normally used to identify a Group in the interface or to provide an indication of what the Group does.
EXAMPLE: If the Group contains an Action to perform an ability called Frost Bolt, then specify Frost Bolt for the Name.
Specify a name in the Name edit box.
By default, a Group that is added or a Group that does not have a Name specified has a Name automatically applied in the following format:
n - Untitled Group
Where n is a sequential number.
When enabled, Interrupt determines whether a Group is checked independently from other Groups in the list that have Interrupt disabled. This is particularly useful to ensure keys and buttons (Actions) associated with a Group are "pressed" as quickly as possible and not delayed by other Groups - especially if the quantity of Groups and associated Actions is high.
If multiple Groups have Interrupt enabled, the order they appear in the list determines the order they are checked.
Click the Interrupt checkbox to add and remove a tick. A tick indicates the Group has Interrupt enabled. Blank indicates the Group has Interrupt disabled.
Action On has the following options that determine when the associated Group is triggered:
| OPTION | DESCRIPTION |
|---|---|
| Time Interval |
Time Interval determines how frequently in milliseconds the associated Group is triggered. To specify a Time Interval, perform the following actions:
MORE: For further details about Action On Time Interval, refer to Behind the Scenes. |
| Trigger Pixel(s) |
Trigger Pixel(s) determines what colour or range of colours one or more pixels at in-game locations must or must not be before the associated Group is triggered. EXAMPLE: If an in-game spell/ability button or icon became highlighted when useable, the Trigger Pixel functionality could be used to detect the colour change of a pixel within the button or icon, so the associated key or mouse button is "pressed". MORE: For further details about Action On Trigger Pixel(s), refer to Trigger Pixels. |
| Always |
Always determines whether the associated Group is always triggered. This is useful when combined with the Status Hot Key functionality and negates the requirement to specify 0 as the Action On Time Interval value. Click the arrow in the Action On edit/list box then select the Always option. |
| Loop Idle |
Loop Idle determines how long in milliseconds Chimpeon should be idle (i.e. no other Group has been triggered) before the associated Group is triggered. EXAMPLE: You could configure Chimpeon to only press a key associated with an in-game spell/ability if no other spells/abilities can be used (i.e. they are all on cooldown). The process works as follows:
To specify Loop Idle, perform the following actions:
|
| Area Scan |
Area Scan determines an area in-game that should be scanned for a Trigger Pixel, and when found, not found or if the pixel moves in a particular way, trigger the associated Group. EXAMPLE: You could configure Chimpeon to cast a fishing bobber/float if it does not already appear in a specified area, then click it when the float/bobber moves in a particular way (like bobbing down when a fish is hooked). MORE: For further details about Area Scan, refer to Area Scan. |
Instant determines whether a Group is checked as soon as Chimpeon is started or after the initial Action On Time Interval expires.
For example, if a Group had a Time Interval of 50,000 milliseconds and Instant was enabled, the Group would be checked immediately after Chimpeon was started then every 50,000 milliseconds.
Click the Instant checkbox to add and remove a tick. A tick indicates the Group is checked instantly. Blank indicates it will be checked after the initial Time Interval.
MORE: For further details about Instant, refer to Behind the Scenes.
Status determines and indicates whether a Group is on or off. When the Group is off it is ignored while Chimpeon is started unless a Status Hot Key is used to turn it on or execute (run) it.
Click a Status cell to specify whether the associated Group is on or off.
MORE: For further details about turning on, turning off and executing a Group with a Status Hot Key, refer to Status Hot Keys.
Active indicates whether the Group is active or inactive.
Click the Active checkbox to add and remove a tick. A tick indicates the Group is active. Blank indicates it is inactive.
NOTE: If the game associated with the configuration file is exited, the tick in all Active checkboxes turns red to indicate the Groups are disabled and cannot be used. Relaunch the game to get going again.
Groups can be selected, added, deleted, duplicated and ordered.
To select a Group in the Groups panel (and as a result display the Actions associated with it in the Actions panel), click any of its settings.
When selected, the associated left-hand cell in the Groups panel contains a white dot.
To add a Group, click the Add button (+). A new Group now appears at the bottom of the Groups panel.
To delete a Group, perform the following actions:
To duplicate a Group (i.e. add another Group with the same configuration to the Groups panel), perform the following actions:
The new Group appears at the bottom of the Groups panel.
To move a Group up and down the list in the Groups panel (and therefore determine the order it is checked), perform the following actions:
One or more Groups together with their associated Action(s) can be imported and exported as a configuration string (see Fig. below). This allows you to share Chimpeon automation with others.
Fig. Example configuration string
To import a configuration string that has been copied to the Windows Clipboard, perform the following actions:
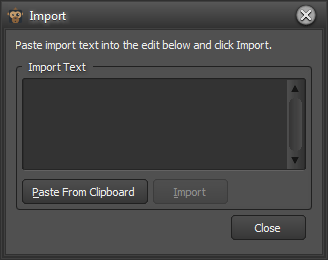
Fig. Import window
If the import is successful an Information window notifies you of this. Click the OK button to close this window and the Import window. One or more Groups and associated Actions that were stored in the configuration string now appear in the Groups and Actions panels.
If the import is unsuccessful a Warning window notifies you of this. Click the OK button to close this window then attempt the import again with a valid configuration string.
To export a configuration string to the Windows Clipboard, perform the following actions:
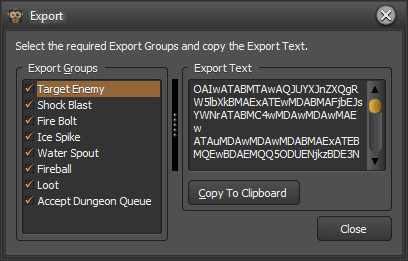
Fig. Export window
Randomize Groups Order in the When Started panel determines whether the order in which active Groups are checked is random or sequential (top to bottom in the Groups panel). If Groups are checked randomly there is less chance of Chimpeon being detected by a game. However, if you are using Chimpeon to automate a combat rotation it is likely DPS will suffer.
Click the Randomize Groups Order checkbox to add and remove a tick. A tick indicates Groups are checked randomly. Blank indicates Groups are checked sequentially.
Delay Between Groups in the When Started panel determines whether there is a delay and what the delay is after checking an active Group. If system instability and a drop in game framerate (FPS) is experienced when Chimpeon is started this setting should be considered. This is because slowing the Chimpeon loop will result is less system resources being used.
EXAMPLE: GroupA [delay] GroupB [delay] GroupC [delay] GroupA [delay] GroupB [delay] GroupC [delay] etc.
Click the Delay Between Groups checkbox to add and remove a tick. A tick indicates there is a delay after each active Group is checked. Blank indicates there is no delay after each active Group is checked.
If Delay Between Groups is enabled (ticked) a delay in milliseconds will need to be specified or the default (100) used.
Click inside the Max milliseconds edit box then specify a number.
To make automation more human-like and to help prevent detection by a game, the Delay Between Groups setting can be randomised.
The value specified for Delay Between Groups is the maximum milliseconds a random delay is derived from.
EXAMPLE: If 200 is the value, a random delay between 1 and 200 milliseconds will occur after each active Group is checked.
Click the Random checkbox to add and remove a tick. A tick indicates Delay Between Groups is random. Blank indicates Delay Between Groups is not random.
Loop Delay in the When Started panel causes Chimpeon to perform a delay between each loop of all active Groups. If system instability and a drop in game framerate (FPS) is experienced when Chimpeon is started this setting should be considered. This is because slowing the Chimpeon loop will result is less system resources being used.
EXAMPLE: GroupA GroupB GroupC [delay] GroupA GroupB GroupC [delay] etc
Click inside the Loop Delay edit box then specify a delay in milliseconds.
NOTE: If the delay is set too high, keys and mouse buttons will be "pressed" less frequently by Chimpeon. This may result in in-game combat rotations being slower than they should be (resulting in lower DPS). It is therefore advised you vary the value until you find the "sweet spot" between system/game stability/performance and the frequency in which keys and mouse buttons are "pressed".
The Attach to "Send To" setting in the When Started panel determines whether keystrokes and mouse clicks are "attached" to the mechanism that sends them to the selected game. If Chimpeon does not work with a game try enabling this setting.
Click the Attach to "Send To" checkbox to add and remove a tick. A tick indicates it is enabled. Blank indicates it is disabled.
NOTE: You may find enabling this setting causes your game to experience "crazy" mouse movement. Disable the setting if this occurs.
An Action determines a key or mouse button Chimpeon will "press" when the Group it is associated with has its Action On setting triggered.
One or more Actions can be added to a Group and each appears in the Actions panel.
Each Action has the following settings:
Shift, Ctrl and Alt determine whether a corresponding modifier key should be used (ticked) or not used (blank) alongside the selected Perform setting.
EXAMPLE: If an in-game spell/ability was controlled by Ctrl 1, then the Ctrl modifier should be selected (as well as 1 for the Perform setting).
Click the Shift, Ctrl or Alt checkbox to add and remove a tick. A tick indicates the associated modifier is used. Blank indicates it is not used.
NOTE: Modifier keys do not work for all games. If a modifier key doesn't work, there is often an alternative way to support the associated in-game spell/ability - like creating an in-game macro or assigning it to a non-modified key.
Perform determines the key, mouse button, Group, Status Hot Key or Sound Chimpeon should "press" or use when the associated Group is triggered.
The following options are provided in the Perform edit/list box:
| OPTION | DESCRIPTION |
|---|---|
| User Defined Key | Any key. |
| Group: Name of Group | All Groups are listed. |
| Hot Key: Name of Status Hot Key | All Status Hot Keys are listed. |
| No Key | No key is "pressed". Can be used to pause Chimpeon by specifying the Pre Delay, Duration or Post Delay settings. |
| Reset Loop | Causes the loop of Groups to start again (i.e. from the top Group down). |
| Play Sound | Enables the selection of a sound file (WAV) and plays the sound. |
| Predefined Key | Keys such as Spacebar, Tab and Enter are listed. |
| Mouse Button | Left, Right and Middle mouse buttons are listed. |
If you select either the Left, Middle or Right mouse button from the Perform edit/list box, a Mouse Position button (a mouse) appears alongside. Click this to open the Mouse Position window (see Fig. below).
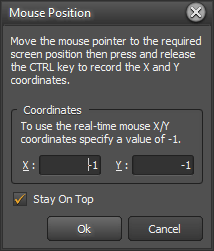
Fig. Mouse Position window
The Mouse Position window enables the specification of where the mouse pointer should be in-game when Chimpeon "presses" the associated mouse button. This is useful when looting mobs and clicking in-game buttons.
Specify (in pixels) the X and Y coordinates in the associated edit boxes or perform the following actions:
NOTE: Setting the X and Y coordinates to -1 causes Chimpeon to perform a mouse click at the current (real time) mouse position.
Method determines how keystrokes and mouse clicks are sent to a game. This setting replaces the RAW setting and it is one of the most important settings when trying to get Chimpeon working with a game.
Method has the following three options, each of which is suitable for different game types and requirements:
| OPTION | NAME | DESCRIPTION |
|---|---|---|
| 1 | Post | Suitable for some Windows MMORPGs or Windows games where being undetected is paramount*. This method was previously used when the (now removed) RAW setting was disabled (not ticked). If Chimpeon previously worked with RAW disabled then use Method 1. When using this Method it is likely you will have to select the correct game window using the Find Send To button (refer to 3.2.1. Finding and Selecting a Specific Game Window). You may also have to enable the Attach to 'Send To' setting if Method 1 does not work (refer to 3.3.7. Attaching Keystrokes and Mouse Clicks to the Send To). |
| 2 | Send | Suitable for many Windows MMORPGs or Windows games where being undetected is paramount*. This method was previously used when the (now removed) RAW setting was enabled (ticked). If Chimpeon previously worked with RAW enabled then use Method 2. You may have to enable the Attach to 'Send To' setting if Method 2 does not work (refer to 3.3.7. Attaching Keystrokes and Mouse Clicks to the Send To). This is the default setting. |
| 3 | SendInput | Enables Chimpeon to work with most Windows games including MMORPG, RPG, FPS, browser, Store and Android (emulated). However, the game must be focussed and the method of sending keystrokes and mouse clicks may be detectable. Use Method 1 or 2 if remaining undetected is paramount*. To enable a game to successfully register a key or button press by Chimpeon, you may need to specify a value for the Duration setting (100 milliseconds or more is normally suitable) (refer to 3.4.1.7. Duration). |
*NOTE: The use of Chimpeon is not guaranteed to be 100% undetectable by a game. However, using Method 1 or 2 is likely to be the safest way to remain undetected. Chimpeon is therefore used at your own risk. Fly Software Limited do not endorse the automation of games where such an action breaks the associated TOS/EULA. Fly Software Limited is not responsible for any game bans, account bans, or financial loss as a result of using Chimpeon.
RAW determines how Chimpeon sends keystrokes and mouse clicks to a game.
Raw was removed in version 1.15.1.1 and replaced by the Method setting (refer to 3.4.1.4. Method).
Pre Delay determines how long Chimpeon should wait in milliseconds before it "presses" the associated key or mouse button.
NOTE: Keys and mouse buttons associated with other Actions are not "pressed" while a Pre Delay is active.
MORE: For further details about Pre Delay, refer to Behind the Scenes.
Duration determines the length of time in milliseconds Chimpeon should keep a key or mouse button "pressed". This is particularly useful when using Chimpeon to move in-game characters or use a charged/channeled spell/ability.
NOTE: A Duration will normally need to be set (100 milliseconds or more is normally suitable) if the Method 3 setting is used.
NOTE: Keys and mouse buttons associated with other Actions are not "pressed" while a Duration is active.
MORE: For further details about Duration, refer to Behind the Scenes
Post Delay determines how long Chimpeon should wait in milliseconds after it "presses" the associated key or mouse button.
NOTE: Keys and mouse buttons associated with other Actions are not "pressed" while a Post Delay is active.
MORE: For further details about Post Delay, refer to Behind the Scenes.
Active indicates whether the Action is active or inactive .
Click the Active checkbox to add and remove a tick. A tick indicates the Action is active. Blank indicates it is inactive.
NOTE: If the game associated with the configuration file is exited, the tick in all Active checkboxes turns red to indicate the Actions are disabled and are not currently being used.
Comment is normally used to indicate what the Action does. For example, if the Action is associated with an in-game action called Fireball then specify Fireball as the comment.
Specify a comment in the Comment edit box.
Actions can be viewed, selected, added, deleted, duplicated and ordered.
Only Actions associated with the selected Group appear in the Actions panel.
Select a Group to view its Actions.
To select an Action in the Actions panel, click any of its settings.
When selected the associated left-hand cell in the Actions panel contains a white dot.
To add an Action, ensure the relevant Group is selected then click the Add button (+). A new Action now appears at the bottom of the Actions panel.
To delete an Action, perform the following actions:
The order of Actions in the Actions panel determines the order they are performed by Chimpeon.
EXAMPLE: If Action A appears at the top and Action B appears below it, the key or mouse button associated with Action A will be "pressed" first.
Chimpeon uses each Action in order (top to bottom) then starts again at the top the next time the associated Group is triggered.
To move an Action up and down, perform the following actions:
The Group/Action Wizard enables the quick and easy creation of Groups and associated Actions. It is particularly suited for configuring combat rotations where the detection of a Trigger Pixel in a spell/ability button or icon is required in order for Chimpeon to press an associated key. The functionality is especially useful when a combat rotation addon is used in-game and priority spell icons are shown in the same place.
The Group/Action Wizard functionality appears in the Group/Action Wizard window (see Fig. below) which is opened by clicking the Wizard button.
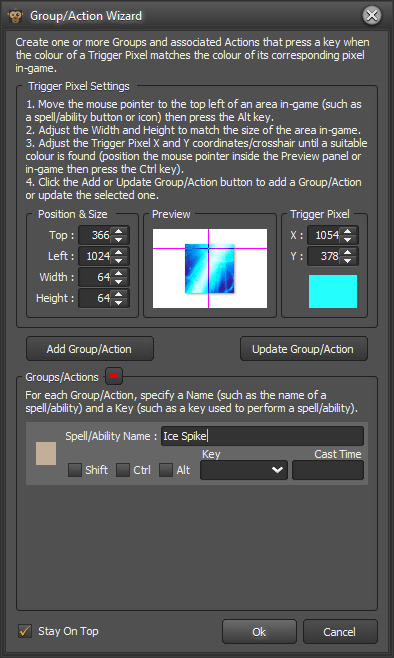
Fig. Group/Action Wizard window
Click the OK button to close the Group/Action window and add all Groups/Actions to the Groups and Actions panels in the Chimpeon interface. A confirmation window appears to indicate how many Groups were added.
Click the Cancel button to close the Group/Action window without adding Groups/Actions to the Groups and Actions panels in the Chimpeon interface.
MORE: For further details about Trigger Pixels, refer to Trigger Pixels.
The Group/Action Wizard window contains the following groups of settings and notifications:
The Position & Size group of settings determines the position and size of an area in-game (such as a spell/ability button or icon) where a Trigger Pixel appears. The position and size specified is reflected by a real time preview of the area in the Preview panel.
The following Position & Size settings are provided:
Top determines the Top (Left) coordinate in pixels of an area in-game.
Move the mouse pointer to the top left of an area then press and release the Alt key to record the coordinate(s). Alternatively type the coordinate in the Top edit box or use the speed buttons to increase or decrease the value.
Left determines the (Top) Left coordinate in pixels of an area in-game.
Move the mouse pointer to the top left of an area then press and release the Alt key to record the coordinate(s). Alternatively type the coordinate in the Left edit box or use the speed buttons to increase or decrease the value.
Width determines the Height in pixels of an area in-game.
Type the height in the Width edit box or use the speed buttons to increase or decrease the value.
Maximum 64 pixels.
The Preview panel displays a live preview of the selected area in-game (such as a spell/ability button or icon) determined by the Position & Size group of settings. A crosshair is also shown if the location of the associated Trigger Pixel is in the area represented by the Preview.
MORE: To reposition the crosshair (and as such the Trigger Pixel) in the Preview, use the Trigger Pixel settings and controls detailed in 3.7.1.3. Trigger Pixel.
The Trigger Pixel group of settings determine the colour of a Trigger Pixel and where it is located in the selected game's window.
The following Trigger Pixel settings are provided:
X determines the X (horizontal) coordinate in pixels of where the Trigger Pixel is located in-game.*
Y determines the Y (vertical) coordinate in pixels of where the Trigger Pixel is located in-game.*
Colour indicates the colour of the Trigger Pixel.
*To change the X and Y coordinates of a Trigger Pixel, perform one of the following actions:
When a Group/Action is added to the Groups/Actions panel, the following settings and visual indicators become available:
Colour indicates the colour of the Trigger Pixel.
If the colour of the Trigger Pixel matches the colour of the associated in-game pixel, the border is green. If it does not match, the border is white. A colour range instead of a fixed colour can be specified outside the Wizard in the Trigger Pixel(s) window.
Name determines the Name of the Group/Action (such as the name of the spell/ability the Group/Action is associated with). This setting is subsequently applied to the Name setting of the Group created in the Groups panel of the Chimpeon interface.
Shift, Ctrl and Alt determine whether a corresponding modifier key should be used (ticked) or not used (blank) alongside the selected Perform setting. These settings are subsequently applied to the associated Action that is created in the Action panel of the Chimpeon interface.
Key determines the key "pressed" by Chimpeon (such as the key associated with a spell/ability) when the colour of the Trigger Pixel matches the colour of its corresponding pixel in-game.
As soon as a key is specified, Chimpeon begins to press this key when the colour of the Trigger Pixel matches the colour of its corresponding pixel in-game. This is useful when configuring Chimpeon for use with a combat rotation addon where the optimal spell/ability always appears in the same place. The key press causes the associated spell/ability to be used and the next priority spell/ability to appear in the Preview ready for adding as another Group/Action.
Cast Time determines the Cast Time in milliseconds of an associated spell/ability. This setting is subsequently applied to the Post Delay setting of the Group created in the Groups panel of the Chimpeon interface.
Groups/Actions can be selected, added, updated and deleted.
Click a Group/Action in the Groups/Actions panel to select it. Once selected its background will become light grey. When selected the Trigger Pixel groups of settings change to reflect the settings of the Group/Action.
When the content of the Preview pane appears in the way you want it to trigger the associated Group, click the Add Group/Action button. Following this, a Group/Action is added to the Groups/Actions panel.
To update a Group/Action, perform the following actions:
To delete a Group/Action from the Groups/Actions panel, perform the following actions:
A Trigger Pixel determines the location and colour or colour range of a pixel somewhere in the selected game's window. The colour or colour range of a Trigger Pixel must match or must not match the colour of its corresponding in-game pixel before the Group it is applied to is triggered.
More than one Trigger Pixel can be specified for a Group to form an expression. These contain either an AND or an OR condition between each Trigger Pixel so multiple in-game conditions must be satisfied before the associated Group is triggered.
EXAMPLE: A Trigger Pixel could be configured so a key is only pressed when a pixel in a spell/ability button is a specific colour (i.e. when the spell/ability button can be used) AND a pixel in a health bar is not a specific colour (i.e. when the health bar has fallen below a certain level).
Trigger Pixels are applied to a Group using the Action On setting's Trigger Pixel(s) option.
The following methods for configuring Trigger Pixels are provided:
NOTE: Trigger Pixels can also be defined using the Group/Action Wizard and Area Scan.
Trigger Pixels appear and can be added and configured in the Expression panel of the Trigger Pixel(s) window (see Fig. below) which is opened by performing the following actions in the Groups panel:
![]()
Fig. Trigger Pixel(s) window
Click the OK button to close the Trigger Pixel(s) window and save changes.
Click the Cancel button to close the Trigger Pixel(s) window and cancel changes.
NOTE: When one or more Trigger Pixels are configured for a Group, the background colour of the associated Action On setting reflects the colours of the specified Trigger Pixel(s).
Each Trigger Pixel in the Expression panel of the Trigger Pixel(s) window contains the following settings:
ID indicates the unique ID of the Trigger Pixel. IDs start at A and finish at Z allowing up to 26 Trigger Pixels to be defined for a single Group. They are necessary for creating manual Trigger Pixel expressions.
MORE: For further details about manual Trigger Pixel expressions, refer to Manual Expressions, below.
And determines whether an AND condition is applied (ticked) or is not applied (blank). Enable this when the colour of the associated Trigger Pixel AND the following Trigger Pixel in the same expression must or must not match the colour of their corresponding in-game pixel.
NOTE: And is unavailable for the first (top) Trigger Pixel in the Expression panel.
Or determines whether an OR condition is applied (ticked) or is not applied (blank). Enable this when the colour of the associated Trigger Pixel must match or not match the colour of its corresponding in-game pixel without any other Trigger Pixel in the same expression needing to match or not match the colour of its in-game pixel.
NOTE: Or is unavailable for the first (top) Trigger Pixel in the Expression panel.
Not determines whether the colour of the Trigger Pixel must match (blank) or not match (ticked) the colour of its corresponding in-game pixel.
X determines the X (horizontal) coordinate in pixels of where the Trigger Pixel is located in-game.
MORE: For details about specifying the X setting, refer to Specifying the X and Y Coordinates and Colour of a Trigger Pixel.
Y determines the Y (vertical) coordinate in pixels of where the Trigger Pixel is located in-game.
MORE: For details about specifying the Y setting, refer to Specifying the X and Y Coordinates and Colour of a Trigger Pixel.
Colour/Range indicates the base colour or colour range of the Trigger Pixel. To trigger the associated Group, the base colour or a colour within the range must or must not match the colour of the corresponding in-game pixel.
When the Colour/Range setting is clicked, negative (-) and positive (+) values and correspsonding speed buttons appear in the Colour/Range cell. These appear on the left and right inside edge of the cell respectively. Click a speed button to increase or decrease the associated value up to and down to 255. As the negative or positive values change so does the colour range in the Colour/Range cell.
NOTE: Both values must remain at 0 if an exact colour match is required to trigger the associated Group.
NOTE: If you are using Chimpeon with streaming, a colour range of -5 and +5 will normally need to be specified due to colour changes in the stream. Increase or decrease the value until the Trigger Pixel is consistently detected (or not detected).
MORE: For further details about specifying the Colour/Range setting, refer to Specifying the X and Y Coordinates and Colour or Colour Range of a Trigger Pixel, below.
Radius determines an area around the specified Trigger Pixel where Chimpeon should look for the Trigger Pixel. The setting is accessed by clicking the Colour/Range cell of a Trigger Pixel. Click a speed button to increase or decrease the Radius setting in 1 pixel increments up to 9 pixels.
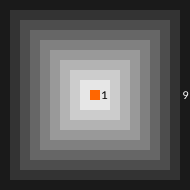
Fig. Example of how the Radius setting works
NOTE: If you are using Chimpeon with streaming, it is likely a Radius setting value will need to be specified due to content of the stream window having a tendancy to move. Increase the value until the Trigger Pixel is consistently detected (or not detected).
Trigger Pixels can be selected, added, deleted and ordered in the Trigger Pixel(s) window.
To select a Trigger Pixel, click any of its settings in the Expression panel.
When selected the associated left-hand cell contains a white dot.
To add a Trigger Pixel to the Expression panel, click the Add button (+).
To delete a Trigger Pixel from the Expression panel, perform the following actions:
The order of Trigger Pixels in the Expression panel can be changed to facilitate the prefered sequence of the expression.
To move a Trigger Pixel up and down, perform the following actions:
To copy a Trigger Pixel to the Windows clipboard, perform the following actions:
To paste a Trigger Pixel from the Windows clipboard, click the Paste button. Following this, the Trigger Pixel is appended to the list of Trigger Pixels.
To specify the X and Y coordinates and Colour/Range settings of a Trigger Pixel, perform the following actions in the Trigger Pixel(s) window:
MORE: If you prefer to have more control over how the X and Y coordinates and Colour/Range settings of a Trigger Pixel are defined, refer to Advanced Configuration.
MORE: The Group/Action Wizard can also be used for specifying the X and Y coordinates and colour of a Trigger Pixel. Refer to Group/Action Wizard.
If an area in-game (like a spell/ability button or icon) changes colour when the mouse pointer is moved over it, or if the screen resolution or window size of a game is changed, the Colour/Range setting of a Trigger Pixel should be refreshed. If a colour range has been specified this will also change to reflect a base colour change.
To refresh the Colour/Range setting of a Trigger Pixel, perform the following actions in the Trigger Pixel(s) window:
The Expression panel in the Trigger Pixel(s) window enables a basic Trigger Pixel expression to be created using the And and Or checkboxes. However, if an expression is required to satisfy a more complex in-game requirement, an edit box to specify it manually is provided.
Before the edit box can be used it must be enabled. Click the Use Manual Expression checkbox. Tick to enable. Blank to disable.
To enable precise control over the configuration of a Trigger Pixel, advanced settings are provided. These are accesible by performing the following actions:
![]()
Fig. Advanced Trigger Pixel Settings window
Click the OK button to close the Advanced Trigger Pixel window and save the changes.
Click the Cancel button to close the Advanced Trigger Pixel window and cancel the changes.
The Advanced Trigger Pixel window contains the following groups of settings and components:
The Position & Size group of settings determines the position and size of an area in a game (such as a spell/ability button or icon) where a Trigger Pixel appears. The position and size specified is reflected by either a saved snapshot or a real time preview of the area in the Preview panel.
NOTE: The Position & Size settings only become available if the Real Time setting is enabled.
Top determines the Top (Left) coordinate in pixels of an area in-game.
Move the mouse pointer to the top left of an area then press and release the Alt key to record the coordinate(s). Alternatively type the coordinate in the Top edit box or use the speed buttons to increase or decrease the value.
Left determines the (Top) Left coordinate in pixels of an area in-game.
Move the mouse pointer to the top left of an area then press and release the Alt key to record the coordinate(s). Alternatively type the coordinate in the Left edit box or use the speed buttons to increase or decrease the value.
Width determines the Width in pixels of an area in-game.
Type the width in the Width edit box or use the speed buttons to increase or decrease the value.
Maximum 64 pixels.
Determines the Height in pixels of an area in-game.
Type the height in the Width edit box or use the speed buttons to increase or decrease the value.
Maximum 64 pixels.
The Preview panel displays either a snapshot or a real time preview of the area in-game (such as a spell/ability button or icon) determined by the Position & Size group of settings. A crosshair is also shown if the location of the associated Trigger Pixel is in the area represented by the Preview.
MORE: To reposition the crosshair (and as such the Trigger Pixel) in the Preview, use the Trigger Pixel settings and controls detailed in 5.2.1.3. Trigger Pixel.
Click to Preview refresh button to refresh the content of the Preview panel based on what currently appears in the specified area in-game.
If the Real Time setting is enabled (ticked), the Refresh button is disabled.
Real Time determines whether the content of the Preview panel appears as a real time preview (ticked) or a snapshot of the specified area in-game (blank). A snapshot is made at the point when the Real Time setting is disabled or when the Refresh button is clicked.
If the Real Time setting is enabled (ticked) the Position & Size group of settings and the Preview Refresh button are disabled.
The Trigger Pixel group of settings determines the base colour or colour range of a Trigger Pixel and where it is located in the selected game's window.
Determines the X (horizontal) and Y (vertical) coordinates in pixels of where the Trigger Pixel is located in-game.
To change the coordinates of a Trigger Pixel, perform one of the following actions:
Not determines whether the base colour or colour range of the Trigger Pixel must match (blank) or not match (ticked) the colour of its corresponding in-game pixel.
Colour indicates the base colour and HEX value of the Trigger Pixel.
Click the Select Colour button (a coloured square) to open the Colour window. Here a base colour for the Trigger Pixel can be selected from the palette, or RGB, HEX or HSB values can be specified. This is useful if the colour of the corresponding pixel in-game is currently not the base colour required for the Trigger Pixel.
Click the OK button to close the Colour window and apply the specified colour.
Click the Cancel button to close the Colour window and cancel any changes.
Click the Refresh Colour button to refresh the base colour of the Trigger Pixel to the current colour of the corresponding pixel in-game. If a colour range has been specified this will also change to reflect a base colour change.
Colour Range indicates the colour range of the Trigger Pixel based upon the negative and positive colour range values. If a colour range is not specified (i.e. the negative and positive values remain 0), the colour shown will be the same colour as the base colour.
Determines the negative (-) and positive (+) colour range values up to and down to 255. Click the associated speed buttons to increase or decrease a value.
NOTE: The negative and positive values must remain at 0 if an exact colour match is required to trigger the associated Group.
The Testing group of settings and notifications enable the Trigger Pixel to be tested during configuration.
Show Preview Detection Indicator determines whether the Preview has a green border when the colour of a Trigger Pixel is matched or not matched (ticked) with the colour of its corresponding pixel in-game, or whether the border continually remains white (blank). Having the border appear green is useful to confirm the associated Trigger Pixel is being matched or not matched when expected.
Press Key determines whether the Testing group of settings below are enabled (ticked) or disabled (blank).
Shift, Ctrl, Alt, Key and Cast Time are provided so Chimpeon presses a key when configuration of the Trigger Pixel is being performed in the same way as if Chimpeon were started. The settings specified are not applied to an associated Action and are purely for testing purposes while the Trigger Pixel window is open.
MORE: For details about the settings, refer to Group/Action Wizard.
Pressed displays the key specified for the Key setting each time it is "pressed" by Chimpeon. This is useful to confirm the Trigger Pixel is being matched or not matched when expected.
Area Scan enables an area in-game to be defined for a Group. When a specified Trigger Pixel is found or not found in the area, or if it moves in a particular way, the Group the Area Scan is associated with is triggered.
EXAMPLE: A Trigger Pixel within a fishing float/bobber could be recorded so the float/bobber is right-clicked when the Trigger Pixel moves down (bobs down) when a fish is hooked.
Area Scan is configured in the Area Scan window (see Fig. below) which is opened by performing the following actions in the Groups panel:
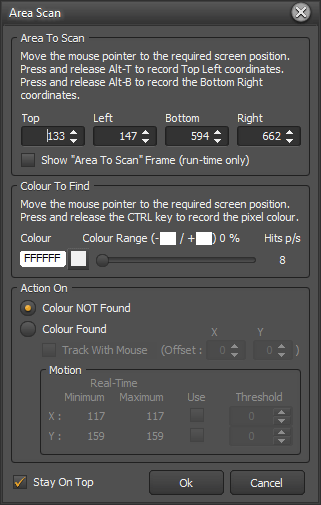
Fig. Area Scan window
Click the OK button to close the Area Scan window and save changes.
Click the Cancel button to close the Area Scan window and cancel changes.
MORE: For further details about Trigger Pixels, refer to Trigger Pixels.
The Area Scan window contains the following groups of settings:
The Area To Scan group of settings determines the area in the selected game where Chimpeon should look for a Trigger Pixel. The scan area can be a square or rectangle and can be any size (but smaller is better*).
*NOTE: If the scan area is too big it may impact the performance of Windows and/or your game.
The following settings are available:
Top/Left determines the Top Left coordinates in pixels of the scan area.
Position the mouse pointer in-game where the top left corner of the scan area needs to be. Press and release Alt-T to record the coordinates.
Alternatively, specify the coordinates in the Left and Top edit boxes.
Bottom/Right determines the Bottom Right coordinates in pixels of the scan area.
Position the mouse pointer in-game where the bottom right corner of the scan area needs to be. Press and release Alt-B to record the coordinates.
Alternatively, specify the coordinates in the Right and Bottom edit boxes.
Show "Area to Scan" Frame determines whether the scan area has a border (ticked) or no border (blank) when Chimpeon is started.
The Colour To Find group of settings determines the colour of the Trigger Pixel to detect or not detect inside the scan area.
NOTE: Aspects of the game environment such as objects, lighting and weather can all impact the detection of a Trigger Pixel or the absence of one in the scan area. As such it may be necessary to configure multiple Groups to handle different environmental conditions. It may also help with the detection of a Trigger Pixel if your character is zoomed in as far as possible.
The following settings, controls and notifications are available:
Colour indicates the colour and HEX value of the Trigger Pixel.
Position the mouse pointer in-game where the Trigger Pixel you want to record appears. Press then release the Ctrl key to record its colour. Alternatively, specify a colour in the Colour window (see Specify Colour, below).
Click the Specify Colour button to open the Colour window. Here a colour for the Colour setting can be selected from the palette, or RGB, HEX or HSB values can be specified.
Click the OK button to close the Colour window and apply the specified colour.
Click the Cancel button to close the Colour window and cancel any changes.
Colour Range % indicates the minus (-) and plus (+) percentage of the Colour setting.
This setting is required because it is likely the lightness (luminosity) of the selected Trigger Pixel will change slightly when the in-game object it is contained in moves (due to environment effects such as lighting). As the percentage is changed, the minus (-) and plus (+) colours also change to indicate the colour range of the Trigger Pixel Chimpeon looks for.
The higher the percentage, the greater the colour range.
A Colour Range of 0% indicates the colour of the Trigger Pixel must match exactly before it is or is not detected.
Click and hold the mouse pointer over the Colour Range slider button then move the mouse right to increase the percentage or left to decrease the percentage. Release the mouse button when the required percentage is shown.
Colour Range minus (-) shows a colour that is calculated by reducing the lightness (luminosity) of the Colour setting by the Colour Range % setting. All colours that fall between this colour and the Colour Range plus (+) colour are looked for.
Colour Range plus (+) shows a colour that is calculated by increasing the lightness (luminosity) of the Colour setting by the Colour Range % setting. All colours between this colour and the Colour Range minus (-) colour are looked for.
Hits p/s shows the number of times per second the selected Trigger Pixel is detected in the scan area. This value will normally continually change when the selected Trigger Pixel is visible in the scan area.
If the value peaks at around 10+ and is never 0 while the object the Trigger Pixel is normally contained in is visible in the scan area, the selected Trigger Pixel and Tolerance are likely to be suitable.
The Action On group of settings determines whether the associated Group is triggered if the selected Trigger Pixel is or is not detected or if it moves in a particular way in the scan area.
The following settings and notifications are available:
*NOTE: These settings and notifications are only available when the Colour Found setting is selected.
Colour NOT Found causes Chimpeon to trigger the Group when the selected Trigger Pixel is not detected.
Click the radio button to select it.
Colour Found causes Chimpeon to trigger the Group when the selected Trigger Pixel is detected.
Click the radio button to select it.
Track with Mouse determines whether the mouse pointer tracks (follows) (ticked) or does not track (blank) the selected Trigger Pixel in the scan area.
Offset X determines the X axis Offset in pixels of the mouse pointer when Track with Mouse is enabled (ticked).
In the edit box, specify a positive number to position the mouse pointer to the right, and a negative number to position the mouse pointer to the left.
Offset Y determines the Y axis Offset in pixels of the mouse pointer when Track with Mouse is enabled (ticked).
In the edit box, specify a positive number to position the mouse pointer above, and a negative number to position the mouse pointer below.
X Minimum and Maximum shows the Minimum and Maximum coordinates in pixels the selected Trigger Pixel moves to in its X axis while visible in the scan area.
Y Minimum and Maximum shows the Minimum and Maximum coordinates in pixels the selected Trigger Pixel moves to in its Y axis while visible in the scan area.
Use X determines whether the X Threshold value is used (ticked) or not used (blank).
Use Y determines whether the Y Threshold value is used (ticked) or not used (blank).
Threshold X determines the number of pixels the selected Trigger Pixel must move in its X axis before the Group is triggered.
Click the edit speed dial buttons to increase or decrease the value or specify your own.
Threshold Y determines the number of pixels the selected Trigger Pixel must move in its Y axis before the Group is triggered.
Click the edit speed dial buttons to increase or decrease the value or specify your own.
^Normally you can calculate a suitable X or Y Threshold value by performing the following calculation while the object the selected Trigger Pixel is contained in is visible and in its "normal" (non-trigger) state:
Highest coordinate (Minimum or Maximum value) - lowest coordinate (Minimum or Maximum value) = Normal pixels moved
Normal pixels moved + Number of pixels the selected Trigger Pixel must move before the Group is triggered = Threshold
EXAMPLE: A Trigger Pixel in a fishing float/bobber has a Y Minimum coordinate of 25 and a Y Maximum coordinate of 29 when it is in its "normal" floating state. The Group should be triggered when the selected Trigger Pixel moves down an additional 3 pixels (i.e. when a fish is hooked). 29 - 25 = 4 + 3 = 7
One or more Status Hot Keys can be specified to turn on, turn off and execute (run) one or more Groups while Chimpeon is started. This functionality is perfect when you need to start or stop particular Groups and their associated Actions, e.g. if you want to change from single target abilities to multi-target abilities, or you want to manually press a key then delay other Groups from being checked and used.
Status Hot Keys are specified and configured in the Status Hot Keys window (see Fig. below) which is opened by clicking the Status Hot Keys button (above the Status setting column in the Groups panel).
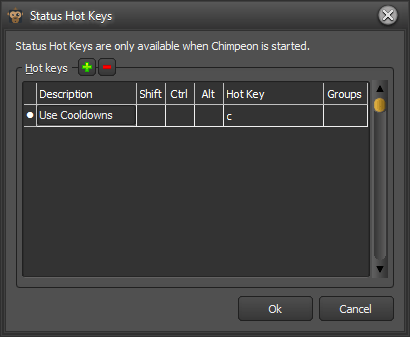
Fig. Status Hot Keys window
The Status Hot Keys window contains a Hot Keys panel where one or more Status Hot Keys can be added and configured.
Each Status Hot Key has the following settings:
Shift, Ctrl and Alt determine whether a corresponding modifier key should be used alongside the key specified for the associated Key setting.
Click the Shift, Ctrl or Alt checkbox to add and remove a tick. A tick indicates the associated modifier is used. Blank indicates it is not used.
Key determines the key that turns on, turns off or executes associated Groups.
Specify a key in the Key edit/list box or select a key from the list.
A key does not need to be specified.
Groups provides a button for opening the Status Hot Key Groups window (see Fig. below).
For further details about the Status Hot Key Groups window, see Configuring Status Hot Key Groups below.
Status Hot Keys can be selected, added, deleted and ordered.
To select a Status Hot Key in the Hot Keys panel in the Status Hot Keys window, click any of its settings.
When selected the associated left-hand cell in the Hot Keys panel contains a white dot.
To add a Status Hot Key to the Hot Keys panel in the Status Hot Keys window, click the Add button (+). A new Hot Key now appears at the top or below the last Status Hot Key in the Hot Keys panel.
To delete a Status Hot Key from the Hot Keys panel in the Status Hot Keys window, perform the following actions:
To move a Status Hot Key up and down the Hot Keys panel in the Status Hot Keys window, perform the following actions:
A Status Hot Key can perform one or more of the following actions when pressed:
One or more Groups can be assigned to these actions on the Status Hot Key Groups window (see Fig. below) which is opened by clicking the button in the appropriate Groups cell on the Status Hot Keys window (see Fig. above).
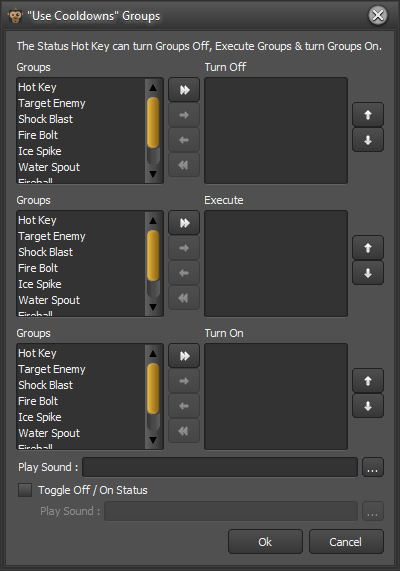
Fig. Status Hot Key Groups window
The examples below demonstrate what Status Hot Keys can be used for:
EXAMPLE 1: To prevent a manually pressed in-game action being interrupted by automated Chimpeon key "presses", a Hot Key can be configured as follows: Turn off all Groups, execute a Group that "presses" a key associated with the in-game action then turn on all Groups (except the one associated with the in-game cast action).
EXAMPLE 2: To swap between single target in-game actions and multi-target in-game actions, a Hot Key can be configured as follows: Turn off all single target Groups then turn on all multi target Groups. A subsequent press of the Hot Key would reverse the process.
EXAMPLE 3: Press a single key to enable all Groups to be checked, and if their conditions are met, perform associated actions. This can be used to satisfy the EULA and TOS of certain games that stipulate in-game actions must be manually performed and not automated.
One or more Groups can be turned on (i.e. their Status in the Groups panel changes to On) when the associated Status Hot Key is pressed. This is accomplished by moving the required Group(s) to the Turn On panel in the Status Hot Key Groups window (see Fig. above).
MORE: For further details about moving Groups to the Turn On panel, refer to Moving Groups below.
One or more Groups can be executed (i.e. Actions associated with the Group(s) are performed if the associated Action On setting(s) is/are satisfied) when the associated Status Hot Key is pressed. This is accomplished by moving the required Group(s) to the Execute panel in the Status Hot Key Groups window (see Fig. above).
MORE: For further details about moving Groups to the Execute panel, refer to Moving Groups below.
One or more Groups can be turned off (i.e. their Status in the Groups panel changes to Off) when the associated Status Hot Key is pressed. This is accomplished by moving the required Group(s) to the Turn Off panel in the Status Hot Key Groups window (see Fig. above).
MORE: For further details about moving Groups to the Turn Off panel, refer to Moving Groups below.
Toggle Off/On Status determines whether a Status Hot Key operates like a toggle or not.
Click the Toggle Off/On Status checkbox to add and remove a tick. Blank indicates the Turn On and Turn Off configurations are always performed when the Status Hot Key is pressed. A tick indicates the Turn On and Turn Off configurations are performed when the Status Hot Key is pressed for the first time then reversed (toggled) when the Status Hot Key is pressed for the second time.
EXAMPLE IF ENABLED: If a Status Hot Key was configured to turn off Group A and turn On Group B, the first key press would turn off Group A and turn on Group B, and the second key press would turn on Group A and turn off Group B.
MORE: For details about applying a sound to a Toggle Off/On Status, refer to Applying a Sound below.
So you have an audible indication of when a Status Hot Key is pressed a sound file (WAV) can be selected and applied to it. An additional sound file can also be applied to the Toggle Off/On Status if the setting is enabled.
To add a sound file, perform the following actions:
Groups can be moved from their Groups panel to the associated Turn On, Execute or Turn Off panel using the Move All and Move Selected buttons provided in the Status Hot Key Groups window (see Fig. above).
When using the Move Selected buttons, select a Group by clicking it. Select multiple Groups in the same panel by holding the Ctrl key then clicking each Group in turn.
The order in which Groups appear in the Turn On, Execute and Turn Off panels, determines the order they are used by Chimpeon (top first). Select one or more Groups in a panel then click the associated Up or Down button to move the Group(s) up or down in the list.
Chimpeon must be started before it "presses" the keys and mouse buttons that have been configured.
Listen, and understand. Chimpeon is out there. It can’t be bargained with. It can’t be reasoned with. It doesn't feel pity, or remorse, or fear. And it absolutely will not stop, ever, until... you stop it.*
*NOTE: If a licence has not been activated, Chimpeon will automatically stop after a short period of time. Buy then activate a licence to remove the time limitation.
Click the Start button (see Fig. below) or the Start Hot Key to start Chimpeon.
![]()
Fig. Start button
Click the Stop button (see Fig. below) or the Stop Hot Key to stop Chimpeon.
![]()
Fig. Stop button
The following actions and conditions also stop Chimpeon:
Chimpeon will also temporarily stop when the menu or certain Chimpeon windows are focused and will start again when unfocused.
To provide quick and easy mechanism for starting and stopping Chimpeon without the need to click the Start and Stop button, a start/stop Hot Key can be specified. When specified the Hot Key starts Chimpeon if stopped and stops Chimpeon if started.
The start/stop Hot Key has the following settings:
Shift, Ctrl and Alt determine whether a corresponding modifier key should be used alongside the selected start/stop Hot Key.
Click the Shift, Ctrl or Alt checkbox to add and remove a tick. A tick indicates the associated modifier is used. Blank indicates it is not used.
Start/Stop Hot Key determines the key Chimpeon should "press" to start or stop Chimpeon.
Specify a key in the Start/Stop Hot Key edit/list box, or select a key from the list.
If nothing happens in-game when Chimpeon is started, it is important you perform the actions detailed in the Chimpeon 101: Getting Chimpeon Working With a Game:
https://chimpeon.com/help/101_detail?id=11
As a key or mouse button is "pressed" by Chimpeon, it appears in the Notification panel at the bottom of the Chimpeon interface. Each key or mouse button is separated by a comma (,).
The Notification panel is useful to determine whether keys and mouse buttons are being "pressed" when expected.
For details about enabling and disabling the Notification panel, refer to Show Notification Panel.
The following preferences appear in the Preferences window (see Fig. below):

Fig. Preferences window
Click the Options menu then select the Preferences option to open the Preferences window.
Click the OK button to apply changes made in the Preferences window and close it.
Click the Cancel button to Cancel changes made in the Preferences window and close it.
The following general settings appear in the Preferences window:
The Update window that appears by default when Chimpeon is launched is disabled and enabled in the Preferences window.
Click the Check For Updates On Startup checkbox to add or remove a tick. A tick enables the Update window. Blank disables the Update window.
The Notification panel located at the bottom of the Chimpeon interface is disabled and enabled in the Preferences window. When Chimpeon is started, keys and mouse buttons that are "pressed" appear here.
Click the Show Notification Panel checkbox to add or remove a tick. A tick enables the Notification panel. Blank disables the Notification panel.
Determines whether Chimpeon stops if the window specified for the Send To setting is not found (closed).
Click the Stop If Send To Not Found checkbox to add or remove a tick. A tick causes Chimpeon to stop. Blank causes Chimpeon to remain started.
When Chimpeon is started and stopped default sounds are played (that say Start and Stop) by default. These sounds can be changed and turned on and off in the Preferences window (see Fig. above).
To change the Start and Stop sounds, perform the following actions:
The sounds played by default when Chimpeon is started and stopped can be turned on and off.
Click the Play Sounds checkbox to add or remove a tick. A tick turns the sound on. Blank turns the sound off.
If your PC connects to the Internet using a proxy it is likely proxy settings will need to be specified so Chimpeon can connect to the application server for licensing purposes.
The following proxy settings are available in the Preferences window:
Specify your proxy settings using the controls provided.
Although configuring Chimpeon is normally simple, there may be occasions when having a better understanding of how it works behind the scenes will be beneficial. This will be most evident when configuring an attack rotation for a game.
NOTE: The explanation below does not apply if the Randomize Groups Order and/or Random Delay Between Groups options are selected. For further details refer to 3.3.7. Determining How Groups Are Checked.
When Chimpeon is started it enters a loop and the Action On Time Interval value (if set) of each Group begins to countdown. While looping, each Group is checked in sequence (from the first (top) Group to the last (bottom) Group in the Groups panel) to see if a) its Action On Trigger Pixel(s) setting has been satisfied or b) its Time Interval value has expired. When this occurs, the Time Interval is reset to its configured value, its countdown begins again then the loop is paused while each Action associated with the Group is performed in sequence (from the first (top) Action to the last (bottom) Action).
NOTE: If the Instant setting is enabled (ticked) and the Time Interval value is specified for a Group, its Actions are performed immediately when Chimpeon is started. If the Instant setting is disabled (unticked) and the Time Interval value is specified for a Group, its Actions are performed when the initial associated Time Interval value expires.
The length of time the loop is paused for equals the Duration and Delay of each Action that is performed. For example, if Action A has a Duration of 500 milliseconds and a Delay of 500 milliseconds, and Action B has a Duration of 100 milliseconds and a Delay of 400 milliseconds, the loop is paused for 1500 milliseconds (500 + 500 + 100 + 400).
When each Group has been checked, the loop repeats and continues to do so until Chimpeon is stopped.
repeat
if Group A's Time Interval value is expired then
perform Action
perform Action
etc...
else
continue loop
if Group B's Time Interval value is expired then
perform Action
perform Action
etc...
else
continue loop
if Group C's Trigger Pixel setting is satisfied then
perform Action
perform Action
etc...
else
continue loop
etc...
until stopped
NOTE: If the Interrupt setting for a Group is enabled (ticked) it is not checked in the normal loop sequence and is instead checked in its own loop sequence (with other Groups with the Interrupt setting enabled).
The examples below will help you understand how Groups, Actions and their associated settings interact with each other, especially when using the Action On Time Interval setting.
A Group has a Time Interval of 10,000 milliseconds and has two Actions (A and B) that each take 1,000 milliseconds to complete (Duration=500 + Delay=500). The Instant setting for the Group is enabled (ticked).
repeat
if the Group's Time Interval value (10,000 milliseconds) is expired then
perform Action A (takes 1,000 milliseconds to complete)
perform Action B (takes 1,000 milliseconds to complete)
else
continue loop
until stopped
A Group has a Time Interval of 10,000 milliseconds and has two Actions (A and B) that each take 1,000 milliseconds to complete (Duration=500 + Delay=500). The Instant setting for the Group is disabled (unticked).
repeat
if the Group's Time Interval value (10,000 milliseconds) is expired then
perform Action A (takes 1,000 milliseconds to complete)
perform Action B (takes 1,000 milliseconds to complete)
else
continue loop
until stopped
A Group has a Time Interval of 10,000 milliseconds and has two Actions (A and B) that each take 6,000 milliseconds (Duration=500 + Delay=5,500) to complete. The Instant setting for the Group is enabled (ticked).
repeat
if the Group's Time Interval value (10,000 milliseconds) is expired then
perform Action A (takes 6,000 milliseconds to complete)
perform Action B (takes 6,000 milliseconds to complete)
else
continue loop
until stopped
In the example above the Time Interval is redundant (and its value could be set to 0) because its value is less than the time it takes for the associated Actions to complete.
Group A has a Time Interval of 7,000 milliseconds and has a single Action (A) that takes 1500 milliseconds (Duration=1000 + Delay=500) to complete. The Instant setting for the Group is enabled (ticked).
Group B has a Time Interval of 4,000 milliseconds and has two Actions (B and C) that each take 1,000 milliseconds (Duration=500 + Delay=500) to complete. The Instant setting for the Group is enabled (ticked).
repeat
if Group A's Time Interval value (7,000 milliseconds) is expired then
perform Action A (takes 1,500 milliseconds to complete)
else
continue loop
if Group B's Time Interval value (4,000 milliseconds) is expired then
perform Action B (takes 1,000 milliseconds to complete)
perform Action C (takes 1,000 milliseconds to complete)
else
continue loop
until stopped
The following Chimpeon resources are available:
| RESOURCE | URL |
|---|---|
| Download | https://chimpeon.com#download |
| Buy | https://chimpeon.com#buy |
| Account | https://chimpeon.com/account/account |
| Help (this document) | https://chimpeon.com/support/help?id=1 |
| How To Guides | https://chimpeon.com/support/how-to-guides |
| Troubleshooting | https://chimpeon.com/support/troubleshooting |
| Contact Us | https://chimpeon.com#contact |
| https://www.facebook.com/chimpeon | |
| https://twitter.com/chimpeon420 | |
| https://www.instagram.com/chimpeon | |
| Discord | https://discord.gg/2bBvQQq |
You have been sent an email to reset your password.
If you can't find it, check your junk or spam folder.